
Plastering your walls or ceilings with the first coat is essential if you want a smooth and long-lasting finish. Plastering relies on this first layer, often called the scratch coat, for several reasons.
It levels off surfaces, promotes proper plaster-to-substrate adhesion, and serves as a foundation for subsequent applications. To get professional results while plastering, it is vital to understand how to apply and prepare this basic layer.
Learn why the initial coat of fresh plaster is so crucial, what tools and methods are needed, and how to get a professional finish in this article. If you want your plastered surface to look professional and last, whether you’re a professional plasterer or a weekend warrior, you need to learn how to apply the initial layer properly.
What Is The First Coat Of New Plaster?
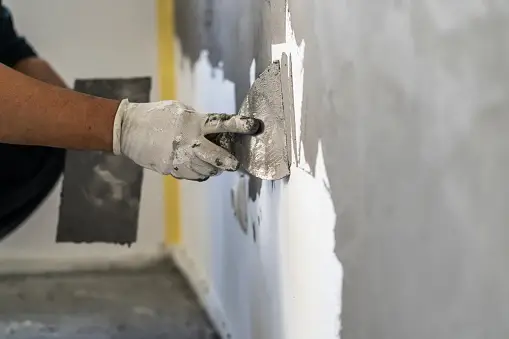
The first coat of new plaster, often referred to as the scratch coat or base coat, is the initial layer applied to a substrate (such as brickwork, blockwork, or lath) before subsequent layers of plaster are added. Its primary purpose is to provide a strong bond between the substrate and the plaster, creating a stable foundation for the finishing coats.
Here are the key aspects of the first coat of new plaster:
- Bonding and Adhesion: The scratch coat adheres tightly to the substrate, ensuring that subsequent layers of plaster adhere securely. This prevents the plaster from delaminating or cracking over time.
- Levelling and Smoothing: It helps to level out uneven surfaces and fills in gaps and imperfections in the substrate. This initial layer creates a more uniform base for the final plaster coats.
- Thickness and Application: Typically, the first coat is applied thicker than the subsequent coats. This ensures that there is enough material to achieve proper bonding and to accommodate any irregularities in the substrate.
- Material Composition: The composition of the scratch coat can vary depending on the type of plaster being used and the substrate. It often includes a mix of sand, lime or cement, and water, formulated to provide good workability and adhesion.
- Technique: Applying the scratch coat requires skill to ensure even coverage and proper compaction against the substrate. Techniques such as keying (scratching the surface) and scoring help improve the bond between the scratch coat and subsequent layers.
- Drying and Curing: After application, the scratch coat needs sufficient time to dry and cure before additional coats can be applied. This allows for shrinkage and settlement to occur, minimizing the risk of cracks in the final plaster finish.
The first coat of new plaster is critical in the plastering process as it sets the foundation for a smooth, durable, and aesthetically pleasing finish. Proper preparation and application of the scratch coat are essential for achieving professional results in plastering projects.
Can You Paint Directly On New Plaster?
Painting directly on new plaster requires careful consideration and preparation to ensure a successful outcome. Here are the key steps and considerations:
- Allow Sufficient Drying Time: New plaster needs adequate time to dry and cure before painting. The drying time can vary depending on factors such as humidity, ventilation, and the type of plaster used. As a general guideline, traditional lime plaster may require several weeks to fully cure, while modern gypsum-based plasters can dry more quickly, often within a few days to a week.
- Prepare the Surface: Once the plaster is completely dry and cured, it should be prepared for painting. This involves:
- Removing Dust and Debris: Use a soft brush or vacuum to remove any dust or loose particles from the surface.
- Filling Imperfections: Check for any cracks or imperfections in the plaster. Fill these with an appropriate filler and allow it to dry before sanding smooth.
- Priming: Priming the plaster is crucial before painting. A primer helps to seal the surface, promote adhesion of the paint, and provide a uniform substrate for the paint to adhere to. Use a primer specifically formulated for new plaster or masonry surfaces. Apply the primer evenly and allow it to dry according to the manufacturer’s instructions.
- Choosing the Right Paint: Select a paint that is suitable for plaster surfaces. Acrylic or latex paints are commonly used for interior walls and ceilings. These paints are durable, easy to apply, and provide a smooth finish. Ensure the paint is compatible with the primer you have used.
- Paint Application: Once the primer is dry, apply the paint using a roller or brush. Work in even strokes and maintain a wet edge to avoid lap marks. Depending on the type and colour of paint, multiple coats may be necessary to achieve the desired finish.
- Drying and Curing: Allow each coat of paint to dry thoroughly according to the manufacturer’s recommendations before applying subsequent coats or allowing normal use of the painted surface.
By following these steps, you can effectively paint directly on new plaster and achieve a durable and attractive finish. Proper drying, surface preparation, priming, and choosing the right paint are essential to ensure the longevity and aesthetic appeal of the painted surface.
Does Fresh Plaster Need Primer?
Yes, fresh plaster generally needs to be primed before painting. Here’s why:
- Sealing and Stabilizing: Fresh plaster is porous and absorbent. A primer helps to seal the surface and create a stable base for the paint to adhere to uniformly. It prevents the paint from being absorbed unevenly into the plaster, which can lead to patchy or uneven colour and finish.
- Promoting Adhesion: Primers are formulated to improve the adhesion of paint to the substrate. They create a bond between the plaster and the paint, ensuring that the paint adheres well and does not peel or flake off over time.
- Enhancing Durability: A primer enhances the durability of the painted surface by providing a barrier that protects the plaster from moisture and other environmental factors. This helps to prevent premature deterioration of the paint and plaster.
- Reducing Effort and Costs: Using a primer can also reduce the amount of paint needed for coverage, as it helps to create a smoother and more even surface. This can result in better coverage and potentially fewer coats of paint required.
While it may be tempting to skip priming fresh plaster, especially if it looks smooth and uniform, priming is a crucial step in the painting process. It ensures a better-quality finish, improves paint adhesion, and helps to protect and preserve both the plaster and the painted surface over time. Therefore, it’s highly recommended to prime fresh plaster before painting.
Conclusion
Preparation and priming are necessary processes before painting on freshly plastered surfaces, be it walls, ceilings, or anything else. To make it stable and homogeneous enough to paint, fresh plaster needs to be sealed because it is porous. Primer has multiple purposes: it promotes adhesion, which in turn makes the painted finish last longer and look better.
By taking the time to do these things right before you paint, you can protect the plaster substrate and get a beautiful, long-lasting paint job. For optimal outcomes, consistently adhere to the drying durations, application methods, and plaster, primer, and paint compatibility guidelines provided by the manufacturer.
Waiting for the plaster to dry completely is the first step in painting over new plaster. To keep the paint from running during the first drying period, it’s essential to remove any moisture. Priming is a must when the plaster has dried. To improve adhesion and guarantee a uniform application of paint, primers are used to seal the porous surface of fresh plaster.
In addition to extending the life of the painted surface, they aid in creating a barrier that shields the plaster and paint from outside elements like dampness. Problems including uneven paint absorption, poor adherence, and early paint failure might occur if the primer is skipped.
Although priming fresh plaster is an additional step in the painting process, it is essential for obtaining a long-lasting and aesthetically pleasing surface, just like a professional.
For more information, click my review here!